
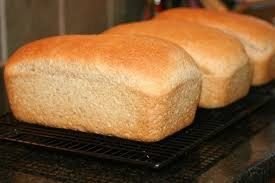
The perfect loaf
Making the perfect loaf of bread is a delightful blend of science and artistry. It requires attention to detail, patience, and a bit of experimentation. From selecting the right ingredients to mastering the techniques of kneading and shaping, every step plays a crucial role in achieving that golden-brown crust and soft, flavorful interior. In this comprehensive guide, I’ll walk you through the entire process, detailing each step and offering tips and tricks along the way.
Part 1: Gathering Ingredients
Before you start, gather all the ingredients you’ll need:
Flour: Choose high-quality bread flour for the best results. Bread flour has a higher protein content, which gives bread its structure and chewiness.
Water: Use filtered or tap water that’s neither too hot nor too cold. The ideal temperature is around 110°F (43°C), which is warm to the touch.
Yeast: You can use active dry yeast or instant yeast. Active dry yeast needs to be activated in warm water before use, while instant yeast can be mixed directly with the flour.
Salt: Use fine sea salt or kosher salt. Salt enhances the flavor of the bread and regulates yeast activity.
Part 2: Mixing the Dough
Measure Ingredients: Accurate measurement is crucial in baking. Use a kitchen scale for precision.
Combine Flour, Water, and Yeast: In a large mixing bowl, combine flour, water, and yeast. Mix until a shaggy dough forms.
Autolyse: Let the dough rest for 20-30 minutes. This allows the flour to fully hydrate and the gluten to develop.
Add Salt: After the autolyse, add salt to the dough. Incorporate it evenly by folding and stretching the dough.
Part 3: Kneading the Dough
Kneading Technique: Kneading develops gluten, which gives bread its structure. Use the heel of your hand to push the dough away from you, then fold it back over itself. Repeat this motion for 10-15 minutes until the dough becomes smooth and elastic.
Windowpane Test: To check if the dough is kneaded enough, perform the windowpane test. Take a small piece of dough and stretch it between your fingers. If it forms a thin, translucent membrane without tearing, the gluten is well-developed.
Part 4: Fermentation
First Rise: Place the dough in a greased bowl, cover it with plastic wrap or a damp cloth, and let it rise at room temperature until it doubles in size. This usually takes 1-2 hours, depending on the ambient temperature.
Punch Down: Once the dough has doubled in size, gently punch it down to release the gases trapped by the yeast.
Part 5: Shaping the Dough
Divide and Pre-Shape: Divide the dough into equal portions for the desired loaf size. Pre-shape each portion into a round ball by folding the edges toward the center.
Bench Rest: Let the pre-shaped dough balls rest on the counter, covered with a kitchen towel, for 15-20 minutes. This relaxes the gluten, making it easier to shape.
Final Shaping: Shape each dough portion into the desired shape—whether it’s a boule, batard, or baguette. Tightly seal the seams to create surface tension.
Part 6: Proofing
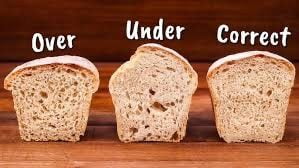
Second Rise: Place the shaped dough on a floured surface or in a proofing basket, seam side down. Cover it with a kitchen towel or plastic wrap and let it rise until it almost doubles in size again. This typically takes 45 minutes to 1 hour.
Finger Dent Test: To check if the dough is properly proofed, gently press a finger into the dough. If the indentation slowly springs back, it’s ready to bake.
Part 7: Baking
Preheat Oven: Preheat your oven to the desired temperature. For most bread, a temperature of 400°F (200°C) works well.
Slash the Dough: Using a sharp knife or razor blade, make shallow slashes on the surface of the dough. This allows steam to escape and prevents the bread from bursting unevenly in the oven.
Baking Technique: Place the dough in the preheated oven and bake until it’s golden brown and sounds hollow when tapped on the bottom. The baking time varies depending on the size and shape of the loaf, typically ranging from 25 to 45 minutes.
Steam: For a crispy crust, create steam in the oven by placing a pan of hot water on the bottom rack or spraying water into the oven with a spray bottle during the first few minutes of baking.
Part 8: Cooling and Storing
Cooling: Once the bread is baked, transfer it to a wire rack to cool completely. Cooling allows the moisture inside the bread to redistribute, resulting in a softer crumb.
Storing: Store the cooled bread in a paper bag or bread box to maintain its texture. Avoid storing bread in plastic bags, as they can trap moisture and lead to a soggy crust.
Part 9: Enjoying Your Perfect Loaf
Now that you’ve mastered the art of bread baking, it’s time to enjoy the fruits of your labor. Whether you slice it thick for toast or enjoy it fresh with butter, cheese, or your favorite toppings, savor every moment of homemade bread goodness. Experiment with different flours, hydration levels, and shaping techniques to create endless variations of the perfect loaf. Happy baking!
Tips and Tricks for Breadmaking at Home: Be mindful when switching up flours from the original recipe: If a bread recipe calls for a particular flour, but you want to use a replacement flour, be mindful of your liquid measurements For instance, bread flour could be replaced for all-purpose flour, but since bread flour absorbs more liquid than all-purpose you would need more liquid I would not recommend substituting a 1 to 1 ratio of whole wheat flour to all-purpose flour. Completely replacing all-purpose flour with whole wheat flour will result in a heavy and dense bread. However, feel free to do half whole wheat flour and half all-purpose Treat bread dough like a living thing: keep it warm and covered: The yeast in the dough is a living organism and should be treated as such with warmth, food (sugar), liquid, and cared for Therefore, the dough is happiest in a warm environment and it should be covered (cling wrap and kitchen towel ‘blanket’) and protected from drafty air Take notes as you bake your bread: Pay attention and write down how you do your steps in bread making because it will help improve how you make bread the next time Good notes could include proofing time, steaming method, baking temps/times, etc. Understand the type of yeast you’re using: Active dry vs. instant yeast Active dry yeast requires that you bloom the yeast in a warm liquid before you mix in your dry ingredients Instant yeast does not need to be activated, instead, it is incorporated into the dry ingredients when mixing the dough Score dough at an angle before you bake: Scoring controls the direction in which your bread will rise during “oven spring” These slits allow for the release of heat through the top of the bread so it doesn’t burst through the bottom/sides When to take out your bread: The bread should be a deep golden brown color A good test would be to tap the bottom — if it sounds hollow, it’s done.
Usage of eggs
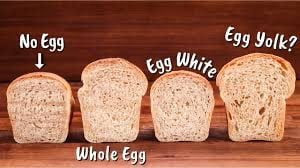
Usually, the same bread dough that contains egg also contains sugar and fat. So, it is more used in enriched dough – be it brioche buns or cinnamon rolls. Most of the time they all contain the whole egg.
I decided to make four breads and I kept it simple with just flour, water, yeast, and salt. One was made without egg as a benchmark. One with a whole egg. One with just the egg white and the last one with only the yolk.
There are some things to consider when writing a recipe that contains egg. First. Is the water and fat content of it. A whole egg is 75% water and 9% fat. An egg yolk is 50% water and 30% fat. And an egg white is 90% water and basically 0% fat. We can adjust the water and fat content in the final dough using these percentages and applying them to the baker’s percentage dough recipe calculations.
But perhaps even more importantly than the calculation is the question of what the egg brings to the final product?
Eggs are extremely nutritious. They are packed full of vitamins and protein which are all beneficial and necessary to our diets. And that is as good of a reason as any for adding eggs to bread dough.
But besides the nutritional benefits there are a few other good reasons to use egg in breadmaking. It makes the bread lighter and fluffier. The reason for that is the fat in the yolk that inhibits gluten formation just as any other fat would. This results in a looser dough that can expand and puff up more.
The egg white on the other hand acts as a coagulant and sets the crumb making it bouncier and chewier in a good way.
Crust is another part of the bread that is greatly affected by egg. It caramelises more and becomes crispier. Breads that contain egg should not be baked at very high temperatures as the crust may go too dark too soon.